ES&S AutoMark
How To Use This Machine
| Voice Over | On-Screen Visual |
|---|---|
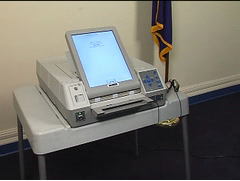
The AutoMark is a ballot marking system designed to permit a voter to privately and independently mark a ballot.
|
|
Voting on the ES&S AutoMark is easy. |
|
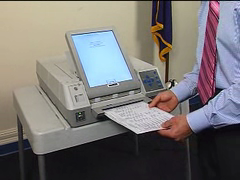
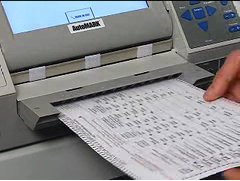
To begin, insert your ballot into the machine.
Note: It takes two to four minutes for the machine to display your ballot – depending on how much information is on the ballot.
|
|
If using a two-part perforated ballot, detach the ballot along the perforation and insert one part into the machine. (NOTE: Once you have completed voting on the first part of the two-part ballot and your marked ballot has been printed, you will need to insert and complete the second portion.) |
|
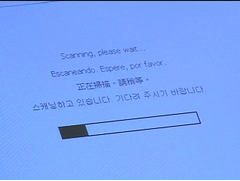
A prompt on the screen will let you know the AutoMark is processing your ballot. |
|
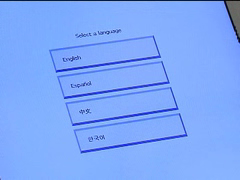
When ballots have been programmed with languages other than English, you will be given a choice of language to select from. |
|
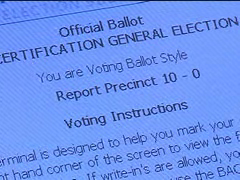
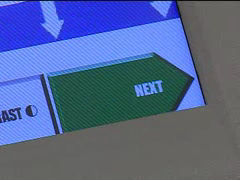
You will be provided with instructionin both audio and visual display – carefully review the instructions and select “next” to proceed to your ballot. |
|
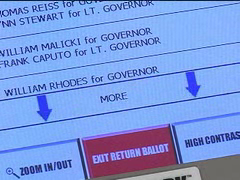
At any time, you may choose to enlarge the letters on screen by selecting the “Zoom In/Out” function. Or, you may choose to change the display to from black letters on a white screen to white letters on a black screen, by selecting the high-contrast function. |
|
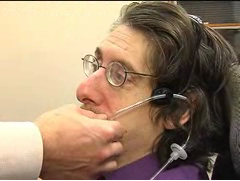
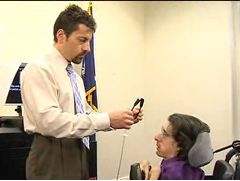
The AutoMark can provide you with audio instruction through the use of headphones. And it also provides access through sip-n-puff devices, tactile controls and paddle devices. Let a poll worker know if you would like to use one of these options.
|
|
The AutoMARK includes an audio control keypad that enables you to adjust volume, pause & repeat audio message, and even adjust the audio tempo. |
|
| Tactile controls | |
audio pictures, headphones, etc. |
|
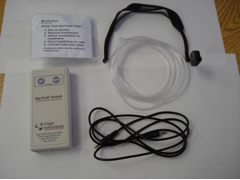
| Sip-N-Puff Device | |
If you choose to use the Sip-N-Puff option, you may provide your own personal sip-n-puff device or use one provided by the Board of Elections. Gloves are provided and used for sanitary purposes so each voter has a clean straw.
|
|
The sip-n-puff device allows you to navigate through your ballot selections using Sip or Puff inputs. When a screen prompts you, you may select Sip to bypass that screen or Puff to move to the first selectable choice on that screen.
|
|
When you are on a selectable item of the screen, the item will be highlighted in yellow. Selecting Sip moves to the next selectable item on the screen. Selecting Puff provides the same result as if you had clicked on that item. |
|
When on a candidate or question choice, Puff selects or deselects that candidate. When on a More scrollbar, Sip causes the screen to scroll up or down as indicated. When on a screen button, Puff triggersthat action. For example, entering Puff when Zoom is highlighted causes then screen to zoom. Entering Puff returns the screen to non-zoomed mode. Selecting Sip at any time moves to the next highlighted item. As you select Sip repeatedly, the highlight moves down the screen, across the bottom from right to left, and then loops back to the top. |
|
When you are done making selections on any given screen, select Sip repeatedly until the Next button is highlighted. Select Puff to move to the next screen. |
|
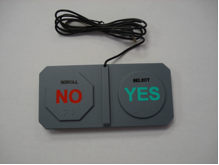
| Paddle Device | |
You can also choose to mark your ballot using a paddle. Plugging in the paddle device allows you to navigate through your ballot using Yes or No inputs. |
|
When a screen displays, you may select No to bypass that screen or Yes to move to the first selectable choice on that screen. When you are on a selectable item of the screen, the item is highlighted in yellow. Selecting No moves on to the next selectable item on the screen. Selecting Yes provides the same result as if you had clicked on that item. |
|
When on a candidate or question choice, Yes selects or deselects that candidate. When on a More scrollbar, No causes the screen to scroll up or down as indicated. When on a screen button, Yes invokes that action.
For example, entering Yes when Zoom is highlighted causes the screen to zoom. Entering Yes again returns the screen to non-zoomed mode. Selecting No at any time moves to the next highlighted item.
|
|
As you select No repeatedly, the highlight moves down the screen, across the bottom from right to left, and then loops back to the top. When you are done making selections on any given screen, select No repeatedly until the Next button is highlighted. Select Yes to move to the next screen.
|
|
| Voting with the AutoMark | |
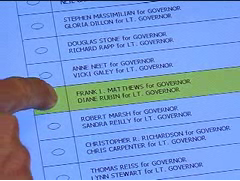
Once your ballot is loaded, you will begin to make selections for each candidate or issue for which you intend to cast a vote. To make a choice, select a candidate or issue, and your selection will be displayed on the screen. If you are using headphones, your selection will be confirmed with audio instruction.
|
|
To move through the ballot after you have voted on a page – select next to move forward. At any time, you may select back to return to a previous page.
|
|
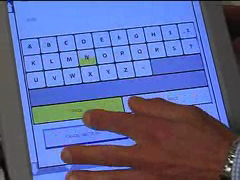
The ESS Automark also allows you to enter a write-in candidate.
To vote for a write-in candidate, select the oval next to the word "Write-in." When the write-in oval is selected, the Write-in screen is displayed. You can then select the letters and space bar on the displayed keyboard to spell the name of the candidate.
Select the OK button when you have completed this selection. The name of your write-in selection will appear on your ballot.
|
|
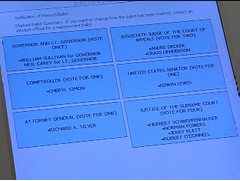
Once voting is complete, you can review your selections on the summary screen before your ballot choices are printed on the ballot.
|
|
To change a selection that is displayed, you may then select the Contest text box on the Summary screen. Select the original selection to deselect that candidate’s name or choice.
Select the new choice, and then select the Next button to return to the Summary screen. When satisfied with all selections, select the Next button.
|
|
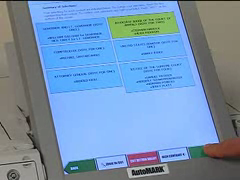
After you are satisfied with all your selections, you are ready to mark your ballot. To do so, select the green blinking next button at the bottom of the screen.
You will be asked to confirm that you would like to mark your ballot by touching the “mark ballot” prompt. |
|
The AutoMark will provide visual instruction and If you are using an audio interface, you will receive and audio messages that the ballot is being printed.
|
|
Printing Ballot and Independent Verification after Ballot has been Printed
|
|
The next step depends on the specific machines used in your polling place. Check with a poll worker to see if your machine will use the AUTOCAST feature.
|
|
| Using the AutoCast Feature | |
If you are voting on a machine that uses the AUTOCAST feature, you will be provided with another summary screen. You will be prompted to select the green blinking Next button.
To review your ballot choices you will be prompted by the machine to select one of two options: Remove Ballot or Auto-Cast Ballot.
|
|
One option that you may choose from is to confirm your ballot selections and have the machine pass your ballot out of the back of the AutoMARK and fed into a locked and sealed ballot box. To do you, you will need to select the Right arrow or forward button.
|
|
The other option which you may choose is if you are not satisfied with the ballot selections is to have the AutoMARK “Present” or remove and return to you the marked ballot through the front feed tray to be to be spoiled. To do so, you will need to select the left arrow or back button.
|
|
You must then return the spoiled ballot to the appropriate Election Inspector.
|
|
To vote a replacement ballot, the appropriate Election Inspector provides a replacement ballot to you. You will need to begin a new voting session.
|
|
| Not using AutoCast feature | |
If you are voting in a county that DOES NOT use the AUTOCAST feature, the machine will return your ballot to you.
|
|
After a few seconds a “thank you for using the ESS Automark” message will appear on the screen – this means you have successfully completed voting your ballot.
|
|
| Independent Verification after the Ballot is Printed | |
To verify your ballot choices After the ballot is printed, you may insert the printed ballot back into the AutoMark.
The machine will provide you with both audio and visual instructions.
When you are ready to begin the review of your printed ballot, select the Green Next button.
|
|
You will be prompted with a summary review screen. Use the Up or Down arrow keys to scroll through and review your ballot selections.
|
|
At the end of the review process, if you are satisfied with your marked ballot, you will be prompted to select the Green Next button or right arrow key to advance to the next screen and the ballot will be returned to you.
|
|
If you are not satisfied with the ballot selections, when prompted by the AutoMARK, select Return Ballot to you to be spoiled.
You must then return the spoiled ballot to the appropriate election inspector and request a replacement ballot.
To vote a replacement ballot, the Election Inspector provides a replacement ballot to you to begin a new voting session.
|
|
A privacy sleeve is provided for you to cover your ballot choices during the transportation of the ballot in the polling place.
|
|
When you are satisfied with the completed printed ballot, you will proceed to the ballot box and insert your voted ballot.
|
|
You have completed the voting process.
|
|

Accessibility Features
| Voice Over | On-Screen Visual |
|---|---|
The AutoMark is a ballot marking system designed to permit a voter to privately and independently mark a ballot.
|
|
In addition, it provides audio assistance in the required languages for use by voters in your poll site to permit voters who are more comfortable navigating the system using audio instruction.
|
|
A sip-n-puff device is provided for voters who are not able to use the touch screen or touch pad.
The Sip-N-Puff device allows you to navigate through your ballot selections using Sip or Puff inputs.
|
|
One time use gloves and a straw are provided and used for sanitary purposes, so each voter has a clean straw.
|
|
In addition, an audio function allows voters with impaired vision to listen to choices through the use of headphones. You may adjust the volume, pause & repeat audio messages, and even adjust the audio tempo.
|
|
One-time use headphones ear covers are provided and used to provide each voter with sanitary audio access.
|
|
A zoom feature enables the voter to increase the font display size of each contest listed on ballot.
|
|
The contrast of the screen may also be adjusted to improve legibility by changing the display from black letters on a white screen to white letters on a black screen, by selecting the high-contrast function. |
|
You can also choose to mark your ballot using a paddle. Plugging in the paddle device allows you to navigate through your ballot using Yes or No inputs.
|
|

Asking For Assistance
| Voice Over | On-Screen Visual |
|---|---|
Poll Workers are always available to provide you with any assistance you may need.
|
|
They will be stationed in various areas in your poll site, including the area near the AutoMark, for easy access to you, should you need or want their help.
Pollworkers are always on hand to provide instruction, or when requested by you, to assist in the use of this equipment as directed by you.
|
|
After you have completed sign-in, you’ll need to select which voting machine works best for you.
|
|
The AutoMark voting machine has several features that are available to any voter who needs them. |
|
These features, such as providing audio messages through the use of headphones, and provides access through Sip-N-Puff devices, tactile controls and, where provided voting paddles, are available to any voter. |
|