New York State Voter Information

The ImageCast Optical  Scan Voting System

Exploring the ImageCast Optical  Scan Voting System

Exploring the ImageCast Optical Scan Voting System

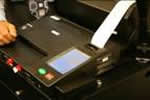
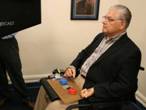
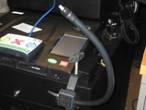
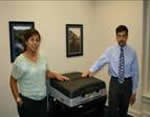
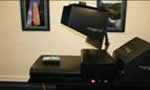
The ImageCast Optical Scan Voting System is a portable voting machine used by your county.  The unit may come with or without the Ballot Marking Device called a BMD, but at least one BMD will be assigned to your polling site. 

ImageCast with ballot marking device

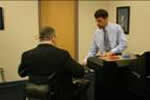
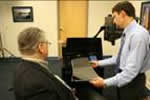
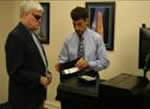
Inspectors are also assigned to your polling site to assist you however and whenever necessary. 

Inspectors at ImageCast machine

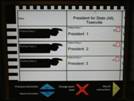
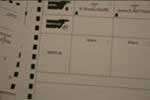
Most voters will obtain a preprinted ballot containing all candidates and contests. This is given to you by an Inspector at your polling site.

Stack of ballots

inspector and voter at table

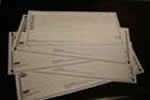
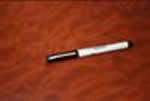
You will be directed to a privacy booth or area where you mark your ballot using a special marking pen. 

Voter marking ballot

special marking pen

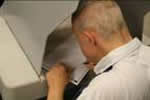
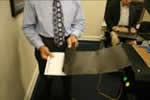
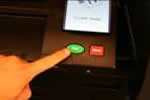
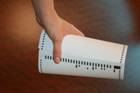
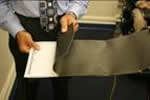
When completed, you will place your ballot into a privacy sleeve and take it to the ImageCast to be scanned.

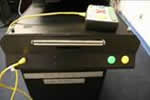
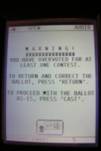
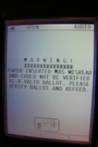
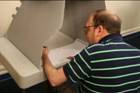
The marked paper ballot is then inserted into the ImageCast Ballot Counter which reads the ballot and deposits it into an internal compartment within the ballot box.

Although your Inspectors are happy to demonstrate how to complete a ballot, some voters may need or want assistance in marking his or her ballot. 

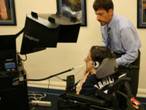
The ImageCast with the BMD has additional features that can assist any voter with this process.  

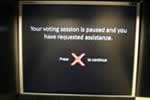
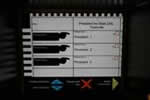
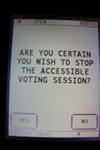
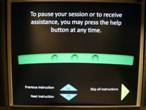
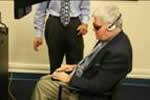
Once you tell the Inspector that you wish to use the BMD, an Accessible Voting Session will be created for you.


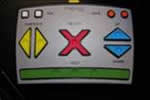
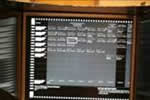
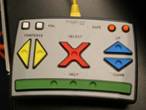
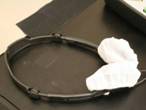
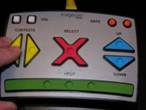
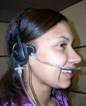
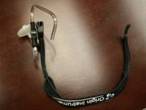
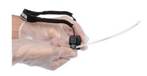
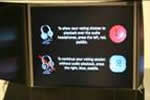
You will be given the option of using one of several assistive devices. 

side view of ImageCast machine

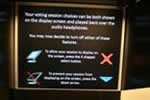
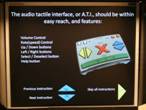
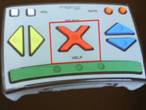
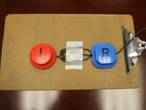
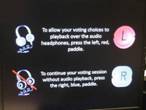
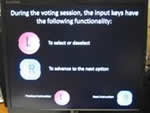
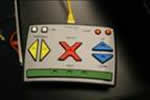
These may include a hand-held Audio Tactile Interface, known as an ATI,

Inspector and voter at machine

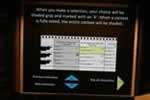
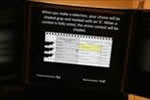
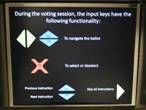
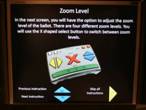
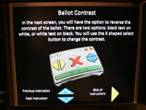
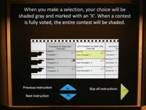
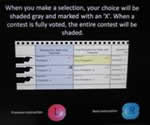
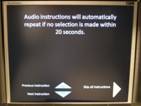
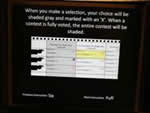
a Sip and Puff device, or Paddle Button device.   All of these devices allow for navigating the ballot.  There is also a display screen, which, at your request, may be turned on at the beginning of your session for you to view the ballot and your selections.

voter using ATI

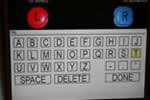
Any of these devices will also instruct you on how to add Write-in votes. 

audio tactile interface

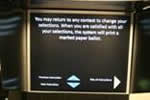
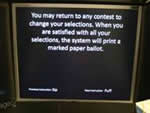
Once your session is completed, the BMD prints a marked ballot, based upon your selections, into a privacy sleeve.  


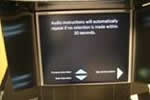
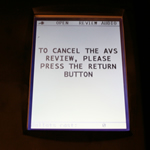
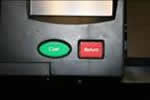
This ballot is then ready to be inserted into the ImageCast’s ballot scanning station, just like the paper ballots.  At this time, upon your request, an audio/visual final review session can be set up. 

close up of ballot

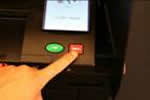
Once satisfied with your selections, you will cast your ballot.  It is automatically deposited into the same internal compartment as all of the other ballots. 

ballot view on screen

There is a separate write-in compartment for storing all ballots with marked write-in votes 

inspector with ballot in privacy sleeve

screen of audi selections

And a lockable auxiliary compartment, which is used as a temporary or emergency repository for ballots.

inspector inserting ballot

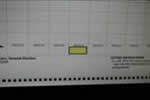
After the polls close, the ImageCast prints a results tape that shows the number of ballots cast


And the tabulated results from all voters’ ballots cast on that machine. 

ImageCast tape printing

Back to Top

The Accessible Voting Session

The Accessible Voting Session

When requested, an Inspector at your polling site will create an Accessible Voting Session for you on the ImageCast BMD.

Inspector and voter at ImageCast

Make sure to let the Inspector know what assistance, if any, is preferred.

Usually, the Inspector will direct you to a chair in front of the movable display screen. 

You will then be asked which accessible device you prefer to use.  Your choices may include the Audio Tactile Interface, called an ATI, a Sip and Puff, or a paddle device. 

Once selected, the Inspector will ensure that the device is properly connected to the BMD.

At the start of your Accessible Voting Session, the ImageCast BMD provides you with step-by-step instructions on how to use the device and walks you through the process of voting your ballot. 


You are always welcome to ask for assistance, or press the Help button when using the ATI.

Audio Tactile Interface

screne of help button

You have the option of using the display screen along with your audio session. 

screen of display instructions

We respect every voter’s right to privacy and it is your choice to have the display screen on or off.


If you do want it turned on, please advise the Inspector at the beginning of your session as it cannot be turned on after the session starts. 

screen of ballot display

Please note, if you require assistance during your voting session, the Inspector or person assisting you will not be able to see what you are doing if the screen is off. 


In this case, the session may need to be cancelled and a new one initiated.

screen of cancel option

At the beginning of your session, you will be able to adjust the display screen Contrast and Zoom settings using your accessible device.  You will also be able to change the volume and speed of the audio.

Some of the accessible devices do not have the ability to allow you to change your display settings once the voting session begins. 


If it will make your voting experience easier to have either the Contrast or Zoom adjusted, let the Inspector know as these can be adjusted on the BMD machine for you. 

contrast and zoom buttons

Also, please be aware that if the audio and visual formats are used at the same time, the visual display does not match the audio word for word.                                                                                                              

Now that you are ready to begin, the Inspector inserts a blank paper ballot into the slot at the back of the BMD printer unit. 

Depending on your polling site, your BMD may be programmed for languages other than English. 

If yours has been programmed, at the start of your audio session, the BMD asks which language you prefer.


Next, you receive voting instructions.

screen of voting instructions

If using the display screen, it automatically displays the ballot.  As you move through the ballot, contest names and candidate names are highlighted in yellow.

 ballot screen

The audio voice reads the contests and candidates to you and provides instructions on how to select your choices. 

Please note, there might be a slight delay between the time a selection is made and it is registered by the BMD. 


If no selection is made within a certain period of time, the instructions are repeated. 

screen of time limit

The accessible session also allows for Write-in candidates.  

Write in space on screen

screen of letter boxes

At the end of the ballot, you have the option to review your ballot and make any desired changes or to skip the review and proceed to printing it. 

screen of review options

screen of reviewing ballot

To ensure your voting privacy, the Inspector will attach a privacy sleeve to the printer unit’s slot to cover your ballot as it prints.  

Inspector inserting ballot

It may take as long as two minutes for the ballot to print. 

ballot printing screen

It is now time to scan your ballot into the Imagecast Ballot Scanner.  Your Inspector will provide you with further instructions. 


Back to Top

Scanning Your BMD Ballot

Scanning Your BMD Ballot

Once you have completed your Accessible Voting Session, you may insert a ballot into the scanner with or without an Audio/Visual Review.

Inspector and voter at ImageCast

If you prefer to do the review, you must let the Inspector know prior to inserting the ballot into the scanner. 

screen asking

This is so the Inspector can program the ImageCast to provide you with an Audio/Visual “independent” review using the same devices and assistive choices as when you voted your ballot. 

Inspector and voter at ImageCast

You can now insert the privacy sleeve into the input slot on the scanner at the other end of the machine.

Inspector inserting ballot

If you need assistance, please advise your Inspector, who will be able to do this for you.   

Inspector and voter at ImageCast

When your review is complete, you can either cancel or cast the ballot. 

cast and return buttons

If you choose the cancel the ballot, it will be returned to you, a replacement ballot is issued, and a new Accessible Voting Session is created.  

return button

Once you choose to cast your ballot by choosing the Select option on the accessible device or scanner, the scanner automatically counts and stores your ballot in the ballot box. 

return button

Back to Top

Using the ATI

Using the ATI

The Audio Tactile Interface is an assistive device that enables voters with visual, cognitive, or mobility impairments to complete a ballot.  However, anyone wishing to use this device may do so.

Inspector and voter at table

The audio-tactile interface is also known as the ATI.

Audio Tactile Interface

Audio is used to convey information over headphones,

headphones

and tactile controls allow you to convey information to the voting system.

Audio Tactile Interface

The ImageCast gives instructions on how to use the ATI, and create your ballot.

welcome screen

You will see the functions of the input keys from the selected device.

Instruction screen

Instruction screen

You may pause the session or

Pause screen

request assistance by selecting the Help button.

Audio Tactile Interface

The screen displays an image of the ballot which can be adjusted through your controls for optimum viewing.

Ballot instruction screen

Size is adjusted with the Zoom settings, and

Zoom instruction screen

Color is adjusted with the Contrast settings.

Contrast instruction screen

You learn how contests and selections are displayed and can review your selections.

Ballot instruction screen

If no selection is made within certain period of time, the instructions are repeated.

Time limit instruction screen

When you are satisfied with all selections, a paper ballot is printed and deposited into a privacy sleeve.

Return option instruction screen

Once printed, you may review the ballot through the scanner for verification.

Scanner review instruction screen

Back to Top

Using the Paddle Device

Using the Paddle Device

If requested, an Inspector will assist you using the paddle device with the ImageCast BMD.

Paddles

Once the paddle device is selected, a welcome screen is displayed. 

Welcome screen

Instructions are provided on screen and or through headphones, depending on your preference

Instruction screen

You learn how contests and selections are made and how you can review your selections.

Paddle function instruction screen

Basically, you press the LEFT/ROUND/RED button to make ballot selections and

Left paddle instruction screen

press the RIGHT/SQUARE/BLUE button to move to the next candidate or screen.

Voter using paddles

If no selection is made within a certain period of time, the instructions are repeated.

Audio instruction screen

You may request assistance from an Inspector at any time during the voting process by asking or holding up your hand.

Inspector and voter at ImageCast

When you are satisfied with all selections, a paper ballot is printed and deposited into a privacy sleeve.

Return instruction screen

Once printed, you may review the ballot through the scanner for verification.

Scanner review instruction screen

Back to Top

Using the Sip-N-Puff

Using the Sip-N-Puff

The Sip-N-Puff device is used to assist voters with physical impairments.

Woman with headset on

If requested, an Inspector will assist you using the Sip-N-Puff device.


There are two types of Sip-n-Puff devices, the Headset device

Headset

or the Gooseneck device. 

goosneck device on table

The Inspector assembles the unit with disposable gloves for your health and safety.


Disposable straws are also used for sanitary purposes to protect you.

Gloved hands holding headset

The gooseneck device is mounted to the ImageCast BMD or table.
The Inspector adjusts the gooseneck tube.

The Inspector attaches a clean straw to the end of the tube.

And places the straw into your mouth.
Then, sip or puff to activate the enabling device.

The device is activated as long as the sip or puff is sustained.
Once you cease sipping or puffing, the device goes off.


Once the Sip-N-Puff device is selected, a welcome screen displays, confirming your choice. 

Welcome screen

The system gives instructions, in both visual and audio formats, on how to use the Sip-N-Puff device.  


The voting session is now ready for you to begin marking your ballot. 

Inspector assisting voter on Sip_N_Puff

The system directs you through the process of creating and marking your ballot.   

Ballot instruction screen

return instruction screen

When you are satisfied with all selections, a paper ballot is printed and deposited into a privacy sleeve.

Instruction screen

Once printed, you may review the ballot through the scanner for verification.

Scanner review instruction screen

At the conclusion of the voting session, the Inspector carefully removes and disposes the straw.


Back to Top

Ballot Error Messages

Ballot Error Messages

There are certain situations in which a ballot is not accepted.
The ImageCast will notify you with a series of short, audible beeps combined with a warning message on the screen should any of these occur.


There are three possible messages:
The ballot is a Blank ballot.
The ballot is an Overvoted ballot.
The ballot was Misread.

Operator screen

A Blank Ballot message is displayed when the scanner does not detect any voter choices on the ballot.


The Blank Ballot warning is provided to alert you, in case you have accidentally omitted making any selections.

Warning screen

A Blank ballot message gives you the option to return the ballot and receive a replacement, or cast the ballot ‘as is’. 

If you want a replacement ballot, press the Return button. The ballot is returned to you. Place it back into the privacy sleeve. 

You will then be directed to return the ballot to the Inspector who initially provided this ballot to you in order to have this ballot “spoiled’ and receive a replacement ballot.

If you choose to have the scanner accept the ballot ‘as-is’, you press the CAST button.

Please note that after the ballot is cast, you cannot receive a replacement ballot.

When the CAST option is selected, the system accepts and counts this ballot and automatically places it into the secure ballot box. 


An over voted ballot warning occurs when the scanner detects that you have selected more than the allowed number of candidates or ballot proposals for the contests indicated. 

Overvoted warning screen

Just like the blank ballot, you can choose to have the ballot returned and receive a replacement ballot, or elect to have the ballot cast ‘as is’.

Marked paper ballot

Please note that if you choose to cast the ballot ‘as is’, the system accepts and counts this ballot only for the selections that are allowed. 


A misread message displays when the system does not recognize all of the features on the ballot,

Misread warning screen

certain essential ballot identification marks are not found, or the scanner cannot properly read your ballot selections.

Ballot with stray marks

Some of the reasons for this may include a physically damaged ballot, such as one that is torn or folded.  This could also occur if ballot has been marked, but is not completely filled in, or has stray marks which might cause the ballot to be ambiguous.

Rolled up ballot

An ambiguous ballot means that the scanner has detected a mark that is unclear and that the system cannot be certain of your voting selection intent.


A misread ballot could also happen if the ballot was inserted into the machine incorrectly. 

A Misread ballot is automatically returned.

If you receive a Misread message, re-insert the ballot. 


If the ballot again generates a misread ballot message due to an ambiguous mark, you could choose to go back to the privacy booth or area to remark the ballot accordingly.

Voter at ballot booth

If the ballot repeatedly generates a misread ballot warning message, return your ballot to the Inspector to receive a replacement ballot. 


Back to Top

Completing a Paper Ballot

Completing a Paper Ballot

Your county board has selected the ImageCast Optical Scan Voting System to process your ballot.

Inspectors at scanner

It is important that you mark your ballot properly before inserting it into the ImageCast scanner to ensure that your vote choices are counted correctly.

 Marked paper ballot

Upon checking in at your polling site, an Inspector issues a paper ballot to you, along with a privacy sleeve which you can use to shield your completed ballot from view.


You will also receive a special ballot marking pen.  Make sure you only use this pen to fill out your ballot. The ballot scanner may not correctly register your vote choices made with any other type of marking device. 

marking pen

You will be directed to a booth or area where you can complete your ballot in privacy. 

Voter at ballot booth

If you haven’t voted before with a paper ballot, make sure to ask the inspector for a demonstration.  Your inspectors are trained to show you how to fill out the ballot and process it on the scanner and are always glad to help. 


The paper ballot has voting instructions, office titles, candidates, and/or issues for this election printed on both sides.

Blank paper ballot

Make sure to mark every contest by completely filling in the square to the upper right of the name of the candidate or issue of your choice.

Marked paper ballot

Do not use an 'X' or other notation."

The marking pen is not erasable, so don’t try to erase or cross out a choice after it has been made.

Make sure that there are no stray marks or doodles on the ballot. 


You should also avoid rolling or folding the ballot.

Rolled up ballot

If you make a mistake or damage the ballot, return it to the Inspector for a replacement. Be aware that you have a limited number of replacement ballots.


You can also include write-in candidates.  Locate the appropriate Write-in section and write the candidate’s name on the line in the space provided.

Write in portion of ballot

After voting, insert the ballot into the privacy sleeve, and proceed to the scanning equipment.

At the ImageCast, place the privacy sleeve into the scanner slot.  The system automatically draws the ballot from the privacy sleeve into the unit.  

The system performs a review of the ballot.  If any ballot error is detected, you are notified with a message and the Inspector will explain your options.

Otherwise, you may press the Cast button on the ImageCast Ballot Counter. 

The ImageCast counts your ballot and stores it in a secure container within the ballot box. 

Congratulations!  You have now successfully cast your vote using the ImageCast Optical Scan Voting System. 


Back to Top